Showing posts with label Process. Show all posts
Showing posts with label Process. Show all posts
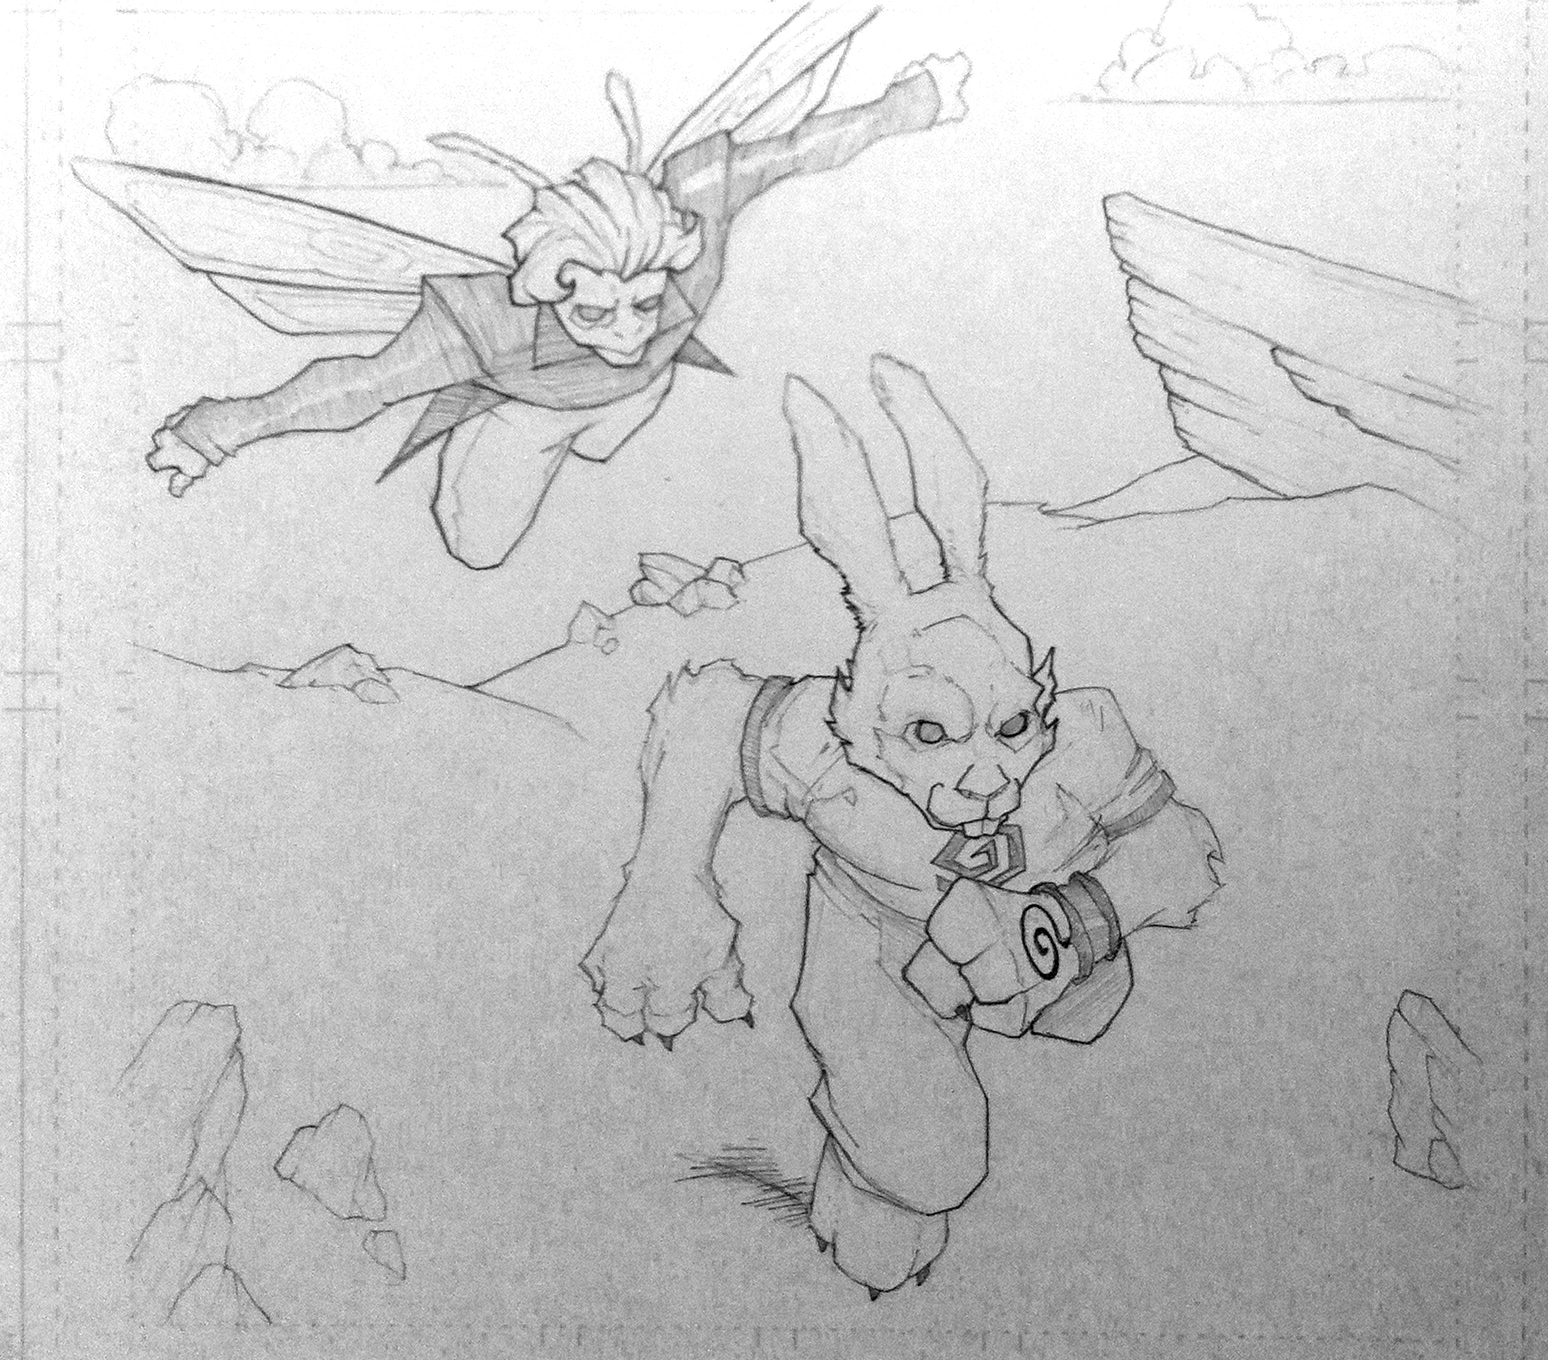
Wednesday, April 10, 2013
Panel 2
So here's panel 2 of page 1. I would have put them both together, but I took the pic with my phone and it looks terrible. My brother got an 11X17 scanner recently and I think it's time I did the same :)

Thursday, March 7, 2013
Storyboards

Since yesterday's post was about thumbnails, I figured I would go with a similar theme and talk about storyboards.
Storyboards are typically created for movies, cartoons, commericals, etc., in order to give the director and producers a visual representation of the script. it shows the action and gives direction for framing shots.
Storyboards can be as simple as stick figures in boxes, or as complicated as fully animated test reels. Even though it's not necessary to make storyboards look great, many have turned it into an art form unto itself.
I dabbled in making short films with some friends of mine for a while, so I had the rare privilege of storyboarding about ninety pages worth of script. It was grueling, but incredibly satisfying. Storyboards are basically comics broken into individual panels, it's all sequential art.
I feel like I grew a lot as an artist. It required me to draw normal people doing normal things. I have a ton of boards, but I've posted some of my favorites below. Notice that some have arrows. That's to indicate the movement in the shot. Sometimes these are for the actors, but other times they can be for the camera movement.


Wednesday, March 6, 2013
Thumbnails
I wanted to cover something that is near and dear to my heart. Any time I approach a comic page, I always thumbnail out the layouts first. I have a lot of fun doing this because it lets me experiment before drawing the actual pages.
Definition: Thumbnail (noun): A very small or concise description, representation, or summary: "a thumbnail sketch"... not the thing that ends up on your bathroom floor. Gross dude.
Basically, a thumbnail is very small rough version of your final page. It should have very little detail, and only capture the layout of your page. I usually try to thumbnail about six pages in advance. I find thumbnailing my book first gives me an idea of the flow. Here's a few examples from issue 2 of Black Hole Cafe.

As you can see, it's very loose. I try to capture the flow of the action without putting too much detail. Anyone familiar with gesture drawing will be familiar with this concept. I feel if I can capture the feeling of the scene in a thumbnail, I can usually recreate it later on. Here's the finished page.


Both of the thumbnails above were done at 1/3 size. Since I use smaller illustration boards than a traditional comic, it comes out to about 2 X 3.5 inches. Yes I know these are bigger than an actual thumbnail... but you've never seen my thumbs! I do this to draw a little more detail than a normal thumbnail. Once again, I do this to capture the feel of the scene.
I love thumbnails. Sometimes I love them more than drawing finished pictures. There's something so immediate and free about doodling. I enjoyed this process so much, that I thumbnailed out all four issues of Black Hole Cafe's first story arc in two days. Needless to say, I had a good time. :)
Go out there and try doodling some of your own!
Definition: Thumbnail (noun): A very small or concise description, representation, or summary: "a thumbnail sketch"... not the thing that ends up on your bathroom floor. Gross dude.
Basically, a thumbnail is very small rough version of your final page. It should have very little detail, and only capture the layout of your page. I usually try to thumbnail about six pages in advance. I find thumbnailing my book first gives me an idea of the flow. Here's a few examples from issue 2 of Black Hole Cafe.

As you can see, it's very loose. I try to capture the flow of the action without putting too much detail. Anyone familiar with gesture drawing will be familiar with this concept. I feel if I can capture the feeling of the scene in a thumbnail, I can usually recreate it later on. Here's the finished page.

This page stayed pretty close to the layout of the thumbnail. However, sometimes they can vary drastically. Take a look at page 16 from the same issue.

I really hated this thumbnail. I didn't like the pose and was worried about what to do. So, I sat there in front of my drawing table for a few minutes imagining the scene and then whipped out a different pose. The layout is basically the same with Dodd standing over an altar, but the end pose and angle are completely different.

Both of the thumbnails above were done at 1/3 size. Since I use smaller illustration boards than a traditional comic, it comes out to about 2 X 3.5 inches. Yes I know these are bigger than an actual thumbnail... but you've never seen my thumbs! I do this to draw a little more detail than a normal thumbnail. Once again, I do this to capture the feel of the scene.
I love thumbnails. Sometimes I love them more than drawing finished pictures. There's something so immediate and free about doodling. I enjoyed this process so much, that I thumbnailed out all four issues of Black Hole Cafe's first story arc in two days. Needless to say, I had a good time. :)
Go out there and try doodling some of your own!
Thursday, February 28, 2013
Warming up
When working on my book I always like to start by warming up. I bet you didn't know that drawing was a contact sport! You definitely don't want to pull a muscle leaning over that drawing table.
Over the years I've learned that I draw consistently better when I'm warmed up. To do this I came up with a system that works pretty well for me.
A few months ago I sat down and came up with a list of monsters that I've never drawn before. I love drawing monsters because they are fun, and the anatomy doesn't have to be perfect. In fact, the more distorted the anatomy the better. I took one of my sketchbooks and wrote the names at the bottom of each page. Each night I would sit down with a timer set for thirty minutes and draw whatever was next on the list. If I didn't get done in the allotted time, I would finish the next night. The key is to remember these are sketches and not portfolio pieces.
Here's a warm up sketch from a few months ago.

It was supposed to be a plant creature who ended up being a mushroom guy, meh. I broke one of my own rules there, so I have to go back and draw the plant monster soon. Don't piss off the client!
This warm up process works great for a few reasons.
#1. You don't waste any time thinking about what you want to draw.
Thirty minutes goes by very quickly. And if you're like me, you don't have a lot of extra time to draw at night. I have a full time job during the day, so every minute in the evening counts.
#2. You force yourself to draw what's been assigned.
I'm my own project manager. (aha! future post idea, time management) Anyway, I treat myself like an employee. This means I don't get to draw what I want, I draw what the client wants, which is me. Confused yet? When I was young I would sit down at that blank page and just draw what came to mind, often switching in the middle of picture if it didn't come out right. The purpose is to MAKE it come out right.
#3. Thirty minutes warms you up, but doesn't burn you out.
Thirty minutes for me is the perfect amount of time. Any longer than that and I start eating into my comic page time. Once again, If I was a full time artist I would probably spend more time on sketches, but for now this works.
Let me know if you guys have any warm up strategies.
Wednesday, February 27, 2013
Pens Dammit!!
So I'll be the first to say I'm not the world's greatest inker. In fact, I kind of suck at it. This is probably why I'm not inking professionally for a big comic company. I do admit that I'm not a huge fan of inked work. Sure it looks pretty, and makes your work look much more professional, but I love seeing the pencil lines. I know I've said that before. That's one of the reasons Black Hole Cafe isn't inked. Maybe it was a mistake, but I'm happy with the results.
Still, I fully appreciate the inker. My brother does amazing inks, with a very unique style. I will most likely ask him to collaborate on some stuff in the near future. Even though I don't ink my work very often, I'm definitely no stranger to it. In fact, a few of the pictures in my previous posts were inked by yours truly.
Here's a couple of examples of my inked sketches.


These were all done on sketchbook paper, so they are a little messy. If done on illustration board, they would look a lot tighter. What you'll notice is there is a definite difference in line weight. Back in the day artists would achieve this with an actual ink brush. By working the angle and the stroke... (is this getting dirty?) Anyway, by the angle of the brush they could achieve very fine lines, or broad black strokes.
Since I don't have that kind of skill or patience, I opt for different sized pens. You can find these at any art store. Currently my faves are Premier by Prismacolor. I have, in order of size from smallest to largest, a 005, 01, 03, 05, and 08. I also use a Sharpie Fine Point for the bigger areas. Sharpies are pretty much a staple of an artist's tool kit. Here's a sexy photo shoot of some of my pens.
give me sassy... good, now pouty, show me pouty....

As always, it's all about what you are comfortable doing. I know some artists who work almost exclusively in ink. Whatever fits your personal style, and whatever you enjoy doing is what you should go with. Go out and grab a bunch of pens. See what works for you.
Monday, February 25, 2013
Black Hole Cafe Concept

Back between 1999 and 2001 I waited tables at a local twenty four hour cafe called Kerbey Lane. I worked the graveyard shift exclusively. For a few years this place was like my own private club house. Most of my friends worked there, including my brother and best friend. It was a time when I could swing by at 1AM on any given night and drink coffee with my friends. I had worked night jobs before, but never at a place quite like this one. The restaurant has moved buildings in the past few years, so my club house lies vacant. I always dream of buying the building and running a coffee shop, just so I can find that vibe again.You would think two years wouldn't really affect someone that much, but it was a pivotal time in my life in a lot of ways. It's when the idea for Black Hole Cafe first started to emerge.
The most glaring similarity is the cafe after dark. The world looks different at night. Even the people are different. I'm a night person, always have been. Even as a kid I knew that the day belonged to the worriers, the rat racers. If you can't tell, I'm not a fan of day people. I feel like they are too loud, too aggressive, too focused on the physical world. Even though over the years I've been forced to live among them, I'm not one of them.
The night has always been magical to me. My favorite thing used to be walking at night. The loud people go to bed, and the world becomes quiet and peaceful. You have room to breathe and think. Every night I would walk through the neighborhood and stare at the trees. It seemed like magic was creeping around every corner. It's almost as if there is this silent presence watching you, nothing malicious, just curious and present.
That's why I set my comic in a place like Black Hole Cafe. I worked nights, so it was during these years that I formed the idea for the story. I wanted to capture that feeling. It's based on People who live on the fringes of the normal world. And like me, they prefer the night too. I've also always been fascinated with the occult. I wanted to use these characters to explore those topics.
(See picture at top of Post)
Here's a few old sketches from 2000 I pasted together. The pic of Kole is actually from around 2004, the rest are the original ideas for the first comic. The pic of Simon on the far right is the first picture I ever did of him. His name just popped into my head as I was doodling his face. He's changed over the years, but he's still the same guy. The thumbnails are layouts of a scene from the original comic. The character that eventually became Dodd was more like Jimi Hendrix in the beginning. In this scene he is making a coat for Simon out of leaves. I'm still going to use this idea, just not until after the first story arc is over.

This is a pic I did of Simon while working at a hotel in 2004. It wasn't a Holiday Inn, but you can see the stamp from the sticky I was doodling on. Originally he had this black and green scarf. I loved the way it looked, but since Simon was partly inspired by Doctor Who, I thought it was too close.
Incidentally, Simon is inspired by a lot of characters, all people who straddle the world of the supernatural. Harry D'Amour, John Constantine, and Harry Dresden, just to name a few. Somewhere in my mind these characters all meet for a drink and talk about what bastards their creators are for making their lives hell. I'm definitely no exception. Simon is in for a life of pain.
Thursday, February 21, 2013
Paper Ya'll
Growing up I drew on anything that was laying around. I started with construction paper and then typing paper. My favorite were the handouts in school. Instead of listening to the teacher or actually doing my work, I would spend all of my time drawing in the margins. And when that was full, I would flip it over onto the back and fill that up too.
It wasn't until high school art class that I was introduced to the idea of a sketchbook. Everything I scribbled in them was terrible, but it was where I really started to learn the idea of progression. Looking back as a senior on my Freshman books, I realized that you can actually get better with practice. What a novel concept!
With college came fancier pens, pencils, and of course paper. I still had my sketchbooks, but was required to try different weights and thicknesses of paper. Some were smooth like baby butts, some were super toothy (rough), and pretty much everything in-between.
Eventually I found out what works for me and what doesn't. I love the way sketchbook paper feels when I'm sketching. I love a little bit of tooth. I also love the way it enhances my lines and accepts my organic strokes... um, maybe my sketchbook and I should get a room.
To clarify, there are so many different types of paper available to an artist, it's almost impossible to cover it here. Even sketchbooks are like Baskins Robbins, there's a flavor for everyone.
Anyway, when I started working on my comic I realized something. My sketchbook had TOO much tooth. When I scanned in the first seven or eight pages, you can see what I came away with. See the neat little red arrow pointing at the grain from my sketchbook paper? The paper is lighter than this normally. I just bumped up the contrast so you can actually see the grain.

At first I liked it. Black Hole Cafe is supposed to be gritty, sort of a fantasy noir. I almost did the entire book in my sketchbook just because I like drawing there so much. However, after applying the "color" (BHC is a greyscale comic) It made it look dirty, and not in the sexy hollywood kind of way, just regular person dirty. Luckily for me you can use the Curves tool in Photoshop to reduce the dirt.
Note to self: "Post about photoshop techniques in the future"
Self: "Will do boss"
You can see the difference if you go back to the previous post of Simon and Ethan sitting at the table. But here's a scan of the boards I'm currently using from Blue line Pro. (Shameless plug for BLP)

You can immediately see how much smoother the grain is on the paper. I bumped up the contrast on this pic as well so you can see the blue lines. The blue is non-photo repo, which means they don't show up during the printing process. These are printed on Strathmore bristol boards which has a much smoother texture. They are basically thick art boards which hold up really well to most anything you want to do.
Bristol board does take getting used to, but it will make your work look cleaner. The best part about illustration boards is how clean the pencils come out during the scanning process. And trust me, the less time you spend trying to fix dirty drawings after the fact the better. As a musician I always hear the phrase "Let's clean it in post!". This is seldom true in music and almost never true in comics.
Note to self: "Contradict yourself later with a post about using photoshop for corrections"
Self: "Will do boss! We sure like to contradict ourselves don't we?"
There are plenty of articles about paper on the interweb, but as always, get your hands dirty. Go try as many different weights and textures of papers as you can find. Figure out what works for you and your project.
Check out these guys to get you started.
- TF
Wednesday, February 20, 2013
Pencil Power
Time to talk about tools. For years I wondered what other artists used to draw comics. Now that I'm figuring it out, I want to share! I'll cover pencils today and move on to other materials in later posts.
I, like many comic artists, was raised on the trusty #2 pencil. Why not? They were standard issue in school. I remember sharpening my pencil down to a nub, then tossing it for a fresh one. Eventually, I got bored with that generic yellow glare coming off my #2 and started using color coated pencils. They were still regular #2 graphite, but damn did they look neat. I had Halloween pencils, seasonal, glossy, polka dot, etc. My pencil box looked like a rainbow dragon puked in it. The only bad part was the inconsistency.
Then came the internet! Yes, I remember the days of Encyclopedia Britannica. I was able to find interviews with giants like Joe Madureira and Chris Bachalo. They all mentioned the infamous LEAD HOLDER. So if they used one, then of course I had to run out and buy 20. Well, maybe only 1, but still. So now like my heroes, I too use a lead holder and love it. Here's a shot of my lead holders, the sharpener, and my peel-off eraser.

Lead holders are basically a fancy mechanical pencil. My main holder is a Staedtler Mars Technico 780. You can usually find one at any decent art store. The other is a Prismacolor holder my brother gave me. I recommend using a separate sharpener and not the one built into the back of the pencil. The dust gets all over my picture while I'm trying to draw, and smearing makes me grumpy.
There are plenty of benefits to using a lead holder. First off, it never gets shorter. You sharpen the lead and not the pencil. I found that over time I would start holding my pencil differently as it got shorter. The shortening of your pencil takes time and is gradual. However, switching back to a brand new pencil is immediate. Going instantly from two inches to six inches can be traumatizing to your hand... (insert lewd jokes here).
Also, I find the lead holds a point longer than a regular pencil. Maybe it's because I use an F, which is a littler harder than a #2. You can find boxes of pencils with varying hardnesses at any art store. I'm not knocking art pencils, They're just not my thing. I don't need a bunch of leftover B's rolling around in my desk drawer. Plus B's smear. And we all know that smearing makes me grumpy.
I think the biggest benefit is consistency. I've been using one for a few years now and know exactly what kind of lines I'm going to get. I guess that's why the big guys us them. Consistency is key when you are drawing every day. It's like bowling... get your own ball, don't just use what's laying around!
Here's a sample of my pencils from Black Hole Cafe #2.

I've given you my opinion about pencils. But above all else, find what works for you. Don't just take my word for it. Go out and try everything until you settle on something that matches your style.
Next post: Let's talk about paper. Until then, Keep Drawing!
Subscribe to:
Posts (Atom)